Globus Streaming User Guide
Here we explain how to use Globus Streaming in a user’s application. The overall approach to using Globus Streaming in a distributed application is the following:
-
Install the Globus Streaming application tools on the systems where your applications will run.
-
Use the globus CLI, or the webapp to create a Globus tunnel.
-
Initialize the listener and initiator environments.
-
Use the Globus Streaming application tools to launch your applications.
We will go through the details below.
1. Install the Globus Streaming Application Tools
In order to use Globus Streaming you need to install the Globus Streaming toolchain on the Linux system where your applications will run.
The Globus Streams Application Tools package provides the client-side utilities needed to integrate an existing networked application with Globus Streams.
There are two ways to install the Globus Streaming application tools:
1.1. Install from Linux Distribution Packages
If you have root access on a supported Linux system, you can install the
client side packages in a manner similar to that described in the Globus Connect Server installation guide.
Set the repositories as described there, but you only need to install
the globus-streams-libs package as shown below.
Install the updated streaming packages:
sudo dnf install globus-streams-libsInstall the updated streaming packages:
sudo apt install globus-streams-libsThe globus-streams CLI will also need to be installed. globus-streams can be installed from the package repository into a python virtual environment using the following steps. This step requires python on your system; adjust the python3 command to python if necessary.
python3 -mvenv ~/streams-cli && \
. ~/streams-cli/bin/activate && \
pip install --extra-index-url https://downloads.globus.org/globus-connect-server/stable/wheels/ globus-streams-cli
1.2. Install in User Space
For application users that do not have root access, we provide a tarball distribution.
The package includes:
-
A setup script that installs the Python-based Globus Streams CLI tools.
-
Shared libraries implementing the socket intercept mechanism.
-
A launcher script (
globus-streams-launch.sh) for running an application in an environment suitable for automatic connection redirection to a Globus tunnel.
The distribution has the following requirements:
-
Python 3.12 or later — required by the CLI tools installed during setup.
-
GNU libltdl runtime (
libltdl.so.7) — a dynamic linking library typically provided by thelibltdl7(Debian/Ubuntu) orlibtool-ltdl(RHEL/Fedora) package. -
Linux x86_64 — the bundled shared libraries are compiled for
x86_64. (Support for aarch64 is coming soon.)
To install the userspace tools, download and extract the tar package, then run the setup script from the extracted directory:
curl -O https://downloads.globus.org/globus-connect-server/stable/extras/globus-streaming-tools/globus-streaming-tools-latest.tar.gz
tar xfz globus-streaming-tools-latest.tar.gz
cd globus-streaming-tools
./setup.sh
Then source the generated environment file to activate the CLI and set the
required runtime environment variables, like PATH, LD_LIBRARY_PATH, and
the python virtual env:
source ./globus-streams-env2. Create a Globus Tunnel
To create a tunnel, you will need access on a stream access point on each side of the desired data stream.
Start by visiting https://app.globus.org/streams. In the top right corner of the page, click the (+) Create Tunnel link. This will take you to https://app.globus.org/streams/create:
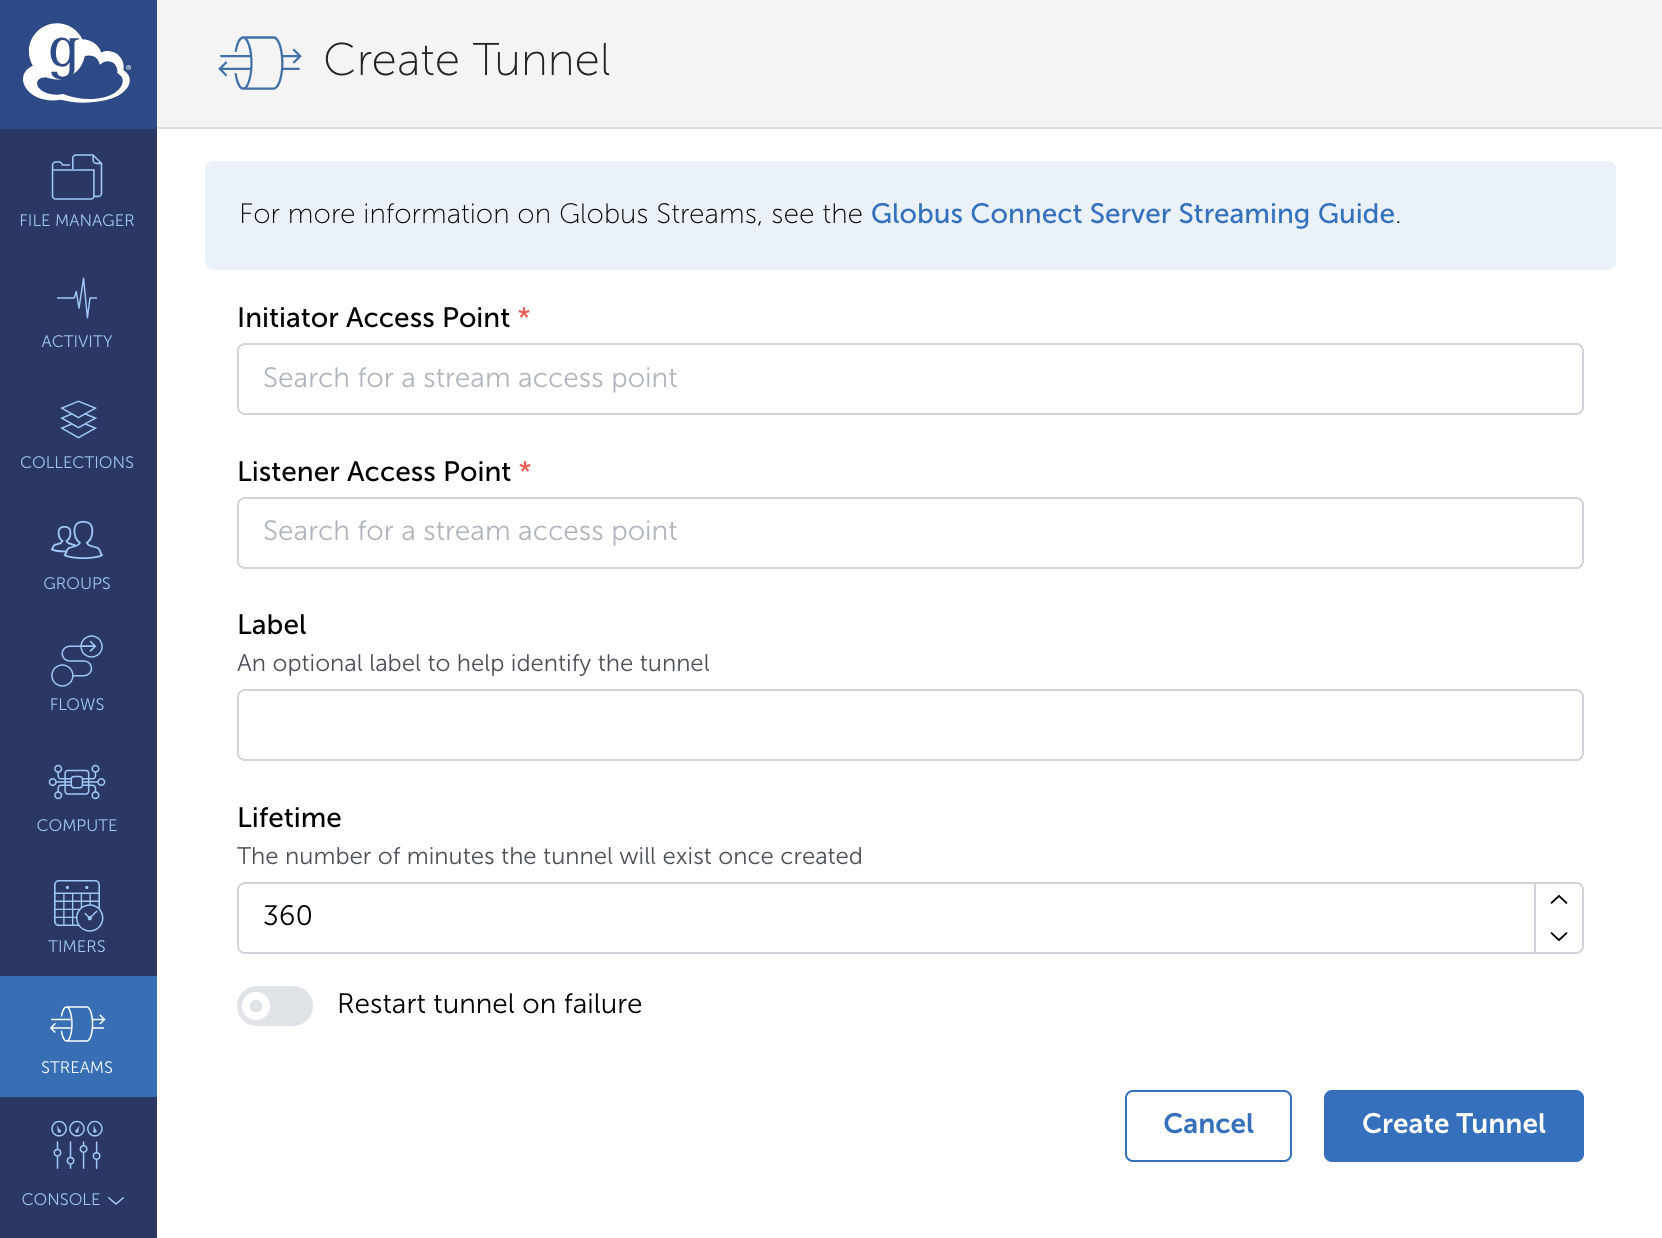
The first two fields define each end of the tunnel. The Initiator Access Point is the side of your tunnel that will be making the active connection. The Listening Access Point is the side of your tunnel that will be listening for connections. In each box you can search for your stream access point by name or UUID. The Label field is an optional user friendly name for the tunnel. The Lifetime field is the number of minutes that the tunnel will be available. When the lifetime expires, the tunnel will be automatically stopped. In the stopped state, Information about the tunnel will remain available until you delete the tunnel.
Once created, your tunnel will be displayed in a list at https://app.globus.org/streams:
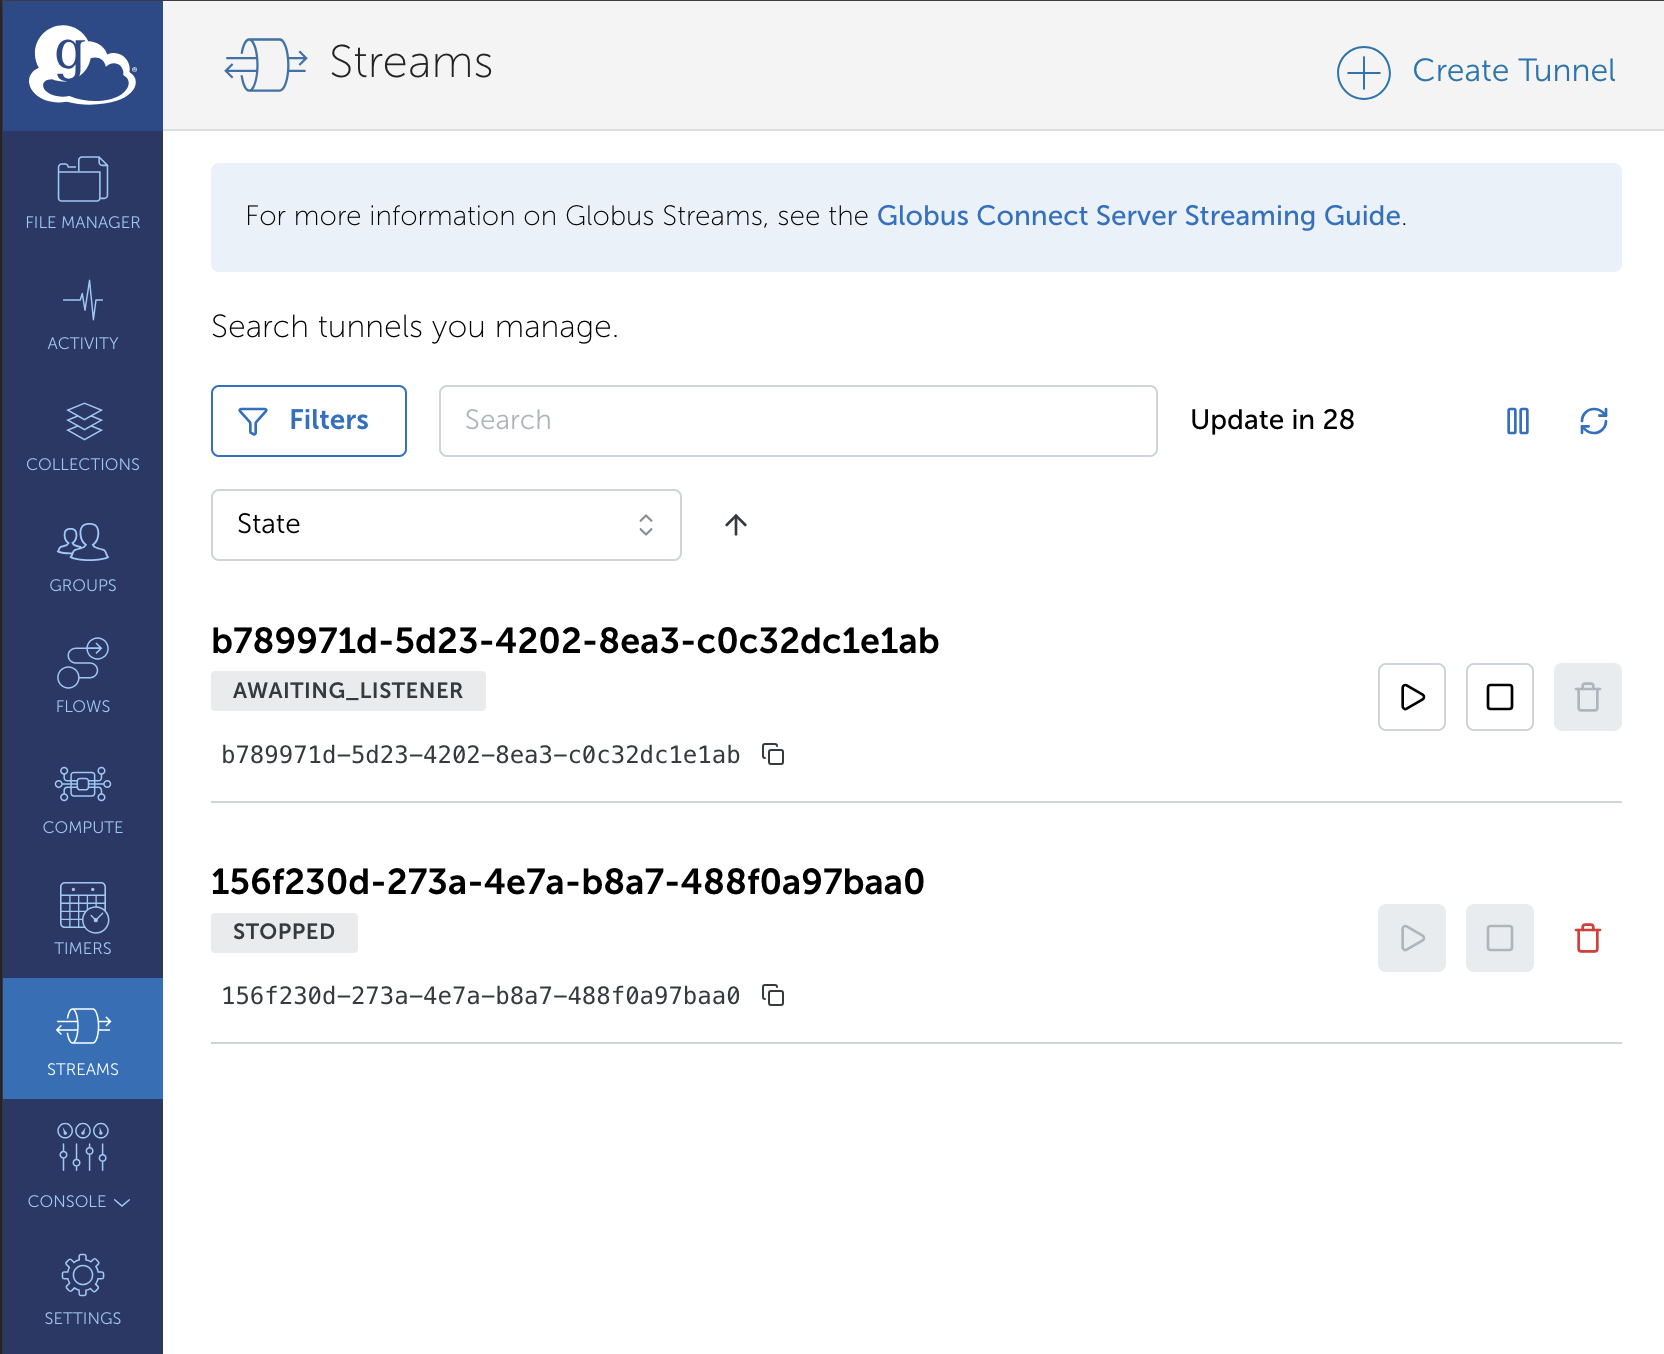
Here you can monitor the state of your tunnels, stop your tunnels, and delete your tunnels.
Once the tunnel is created you will be given a UUID which is how the tools we discuss later reference this specific tunnel.
3. Initialize Your Application Environments
As mentioned above, the systems where the applications run will require the
globus-streams CLI. This is a tool that helps set up your application
environment for use with Globus streaming. It logs the user into the Globus
and retrieves needed information about your tunnel. This information is
written to the file ~/.globus/streams/<tunnel ID>.conf for use when your
application is run.
3.1. Initialize the Listener Application
In order to initialize the listener you will need the ID of the tunnel that you created.
In this example, the nc application will be listening on the IP address 10.0.2.164 on port 8888. The --listener-contact-string option tells Globus this will be the listener application and the contact string where it will be listening.
globus-streams environment initialize --listener-contact-string 10.0.2.164:8888 ${TUNNEL_ID}Now that the environment is initialized, the listening application can be started. To start the listening application so that it uses the tunnel, run it using the globus-streams-launch.sh helper script in the following way:
globus-streams-launch.sh depends on your installation
method. For package installs, the script is at
/usr/share/globus/streams/globus-streams-launch.sh. For tarball
installs, it is at ./bin/globus-streams-launch.sh within the extracted
package (after sourcing globus-streams-env).
globus-streams-launch.sh ${TUNNEL_ID} nc -l 8888-p <port> parameter is no longer
required. globus-streams-launch.sh derives the listening port
automatically from the --listener-contact-string set during
initialization. For version 0.3 and earlier, add -p 8888 before the
tunnel ID: globus-streams-launch.sh -p 8888 ${TUNNEL_ID} nc -l 8888.
This will run your application in the Globus data streaming environment configured for use with your tunnel. The remaining arguments are the exact arguments you use to run your application — in this case, netcat listening on port 8888.
3.2. Initialize the Initiator Application
The initiator application environment is initialized in a similar way as the listener application.
globus-streams environment initialize --globus-contact myhost.com:443 ${TUNNEL_ID}This time we do not require the listening address because this side is forming active connections out. It will retrieve the contact string at run time via the globus-streams CLI.
The --globus-contact option configures the environment so that all connections to the specified hostname and port are routed through the tunnel identified by ${TUNNEL_ID}. The contact string can be any <host>:<port> value, but it should match what the listener expects. For example, if the listener uses an SSL certificate, the domain name provided should match the certificate.
If --globus-contact is not specified, a contact string is automatically generated, and displayed, in the format: globus.<TUNNEL_ID>:<port>. For example:
Your contact string is: globus.0e8a675b-6b84-4220-89e4-a6a7a0d823fb:3664
Any client executed within the Globus Streams environment will route connections to myhost.com:443 and globus.0e8a675b-6b84-4220-89e4-a6a7a0d823fb:3664 through the tunnel.
We will use those values to connect using the telnet application. Start the telnet application in the following way, again using the globus-streams-launch.sh helper script:
globus-streams-launch.sh ${TUNNEL_ID} telnet myhost.com 443You should see a successful connection, and any output you type in the initiator application will be shown in the output of the listener application.
3.3. Debug Output
To enable verbose diagnostic output from the intercept library, pass -d
to the launcher script:
globus-streams-launch.sh -d ${TUNNEL_ID} nc -l 8888To redirect debug output to a file instead of stderr, use -l <file>:
globus-streams-launch.sh -l /tmp/streams-debug.log ${TUNNEL_ID} nc -l 88884. Toolchain Deep Dive
This section describes the internal mechanics of the Globus Streaming application tools for users who want to understand what happens under the hood. Most users can follow the steps in the previous sections without needing this detail.
The tools are based around a library that dynamically loads into your application’s Linux process space and intercepts standard socket library calls that establish connections. This allows the library to redirect connections through a Globus tunnel.
4.1. Tunnel IDs and Contact Strings
When a user creates a tunnel, they are given a tunnel ID. A tunnel ID is simply an ID that is the key to metadata stored inside of the Globus Transfer service. To form the connections required for Globus data streaming, the TCP contact strings must be associated with the tunnel ID so that user applications are able to look up these contact strings based on tunnel ID.
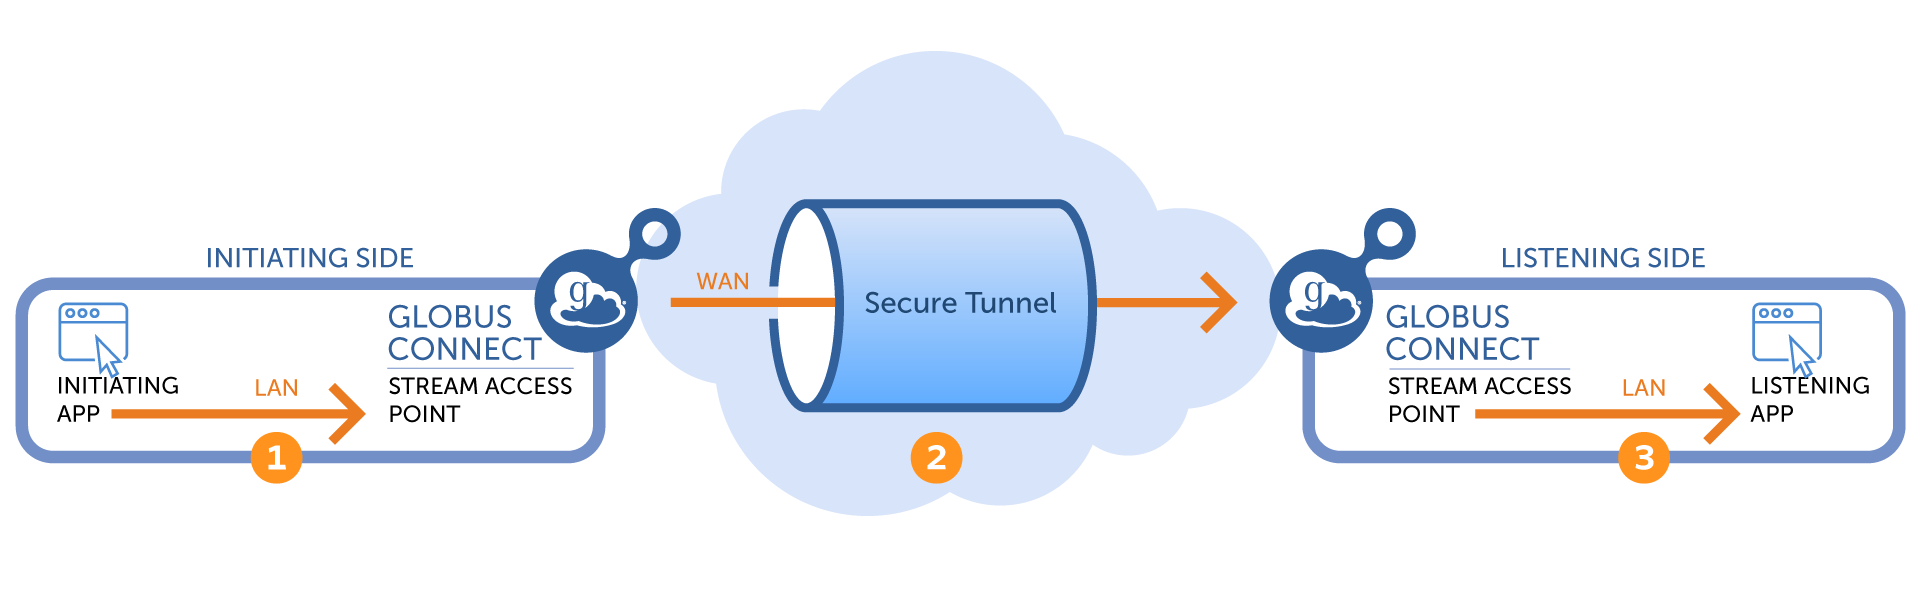
The above diagram shows the network overlay of a Globus data stream. The three arrows show the three TCP connections required for the initiating application to form a connection to the listening application. Arrow 1 represents the TCP connection from the user’s initiating application to the stream access point of the initiating side GCS. Arrow 2 shows the connection between the two stream access points. Arrow 3 represents the connection from the stream access point of the listening side GCS to the user’s listening application. Here we focus on the application facing connections (arrows 1 and 3).
4.1.1. Initiating Application
Let’s start by looking at the connection from the initiating application to
the initiating side GCS (arrow 1). The initiating application must discover
the <ip>:<port> (contact string) to use to contact the initiating
side GCS. The following globus-streams CLI command retrieves the ip:port
from the Globus Transfer service and writes the ip:port to a secure file
under $HOME/.globus/streams/<tunnel id>.conf, which can subsequently be
accessed by the initiating application to contact the initiating side GCS.
globus-streams environment initialize $TUNNEL_IDIt is possible the ip:port is not available or has changed, for example if the initiating side GCS was not ready to accept connections when the environment was first initialized or if the tunnel restarted and therefore the ip:port changed. In such cases, the ip:port will have to be retrieved from the Globus Transfer service again, using the following globus-streams CLI command.
globus-streams environment contact-lookup $TUNNEL_IDThis command first checks to see if the file $HOME/.globus/streams/<tunnel id>.conf exists on the system. If it does, the command checks the file for the time the contact string was last fetched from the file and the timestamp of when it should be looked up in Globus Transfer again. If the contact string has not expired, the command will simply print the contact string. If it has expired, the command will look up the new contact string in Globus Transfer, write it to the file, and print out the new contact string.
4.1.2. Listening Application
Next, let’s look at the connection from the listening side GCS to the listening application (arrow 3). For the listening side GCS to contact the listening application, GCS must know the addressable hostname and port of the application. The following command stores in Globus Transfer the addressable hostname and port of the listening application associated with the tunnel ID so that it is available to the listening side GCS.
globus-streams environment initialize --listener-contact-string 192.168.0.10:8888 $TUNNEL_ID4.2. LAN Secret Fetching
In addition to associating the tunnel ID with the underlying listener addresses, globus-streams environment initialize command requests a LAN secret be associated with the tunnel. The secret is a random string written to $HOME/.globus/streams/<tunnel id>.conf file and is used for the entire lifetime of the tunnel. The secret is used only for the LAN connection between GCS and the application associated with that tunnel. The command must be run on both the initiator and listener sides because each side must have its own LAN secret.
4.3. PRELOAD Library
The PRELOAD library is a lightweight, dynamically loadable library that can run inside the process space of your application to automatically redirect connections to a Globus stream access point.
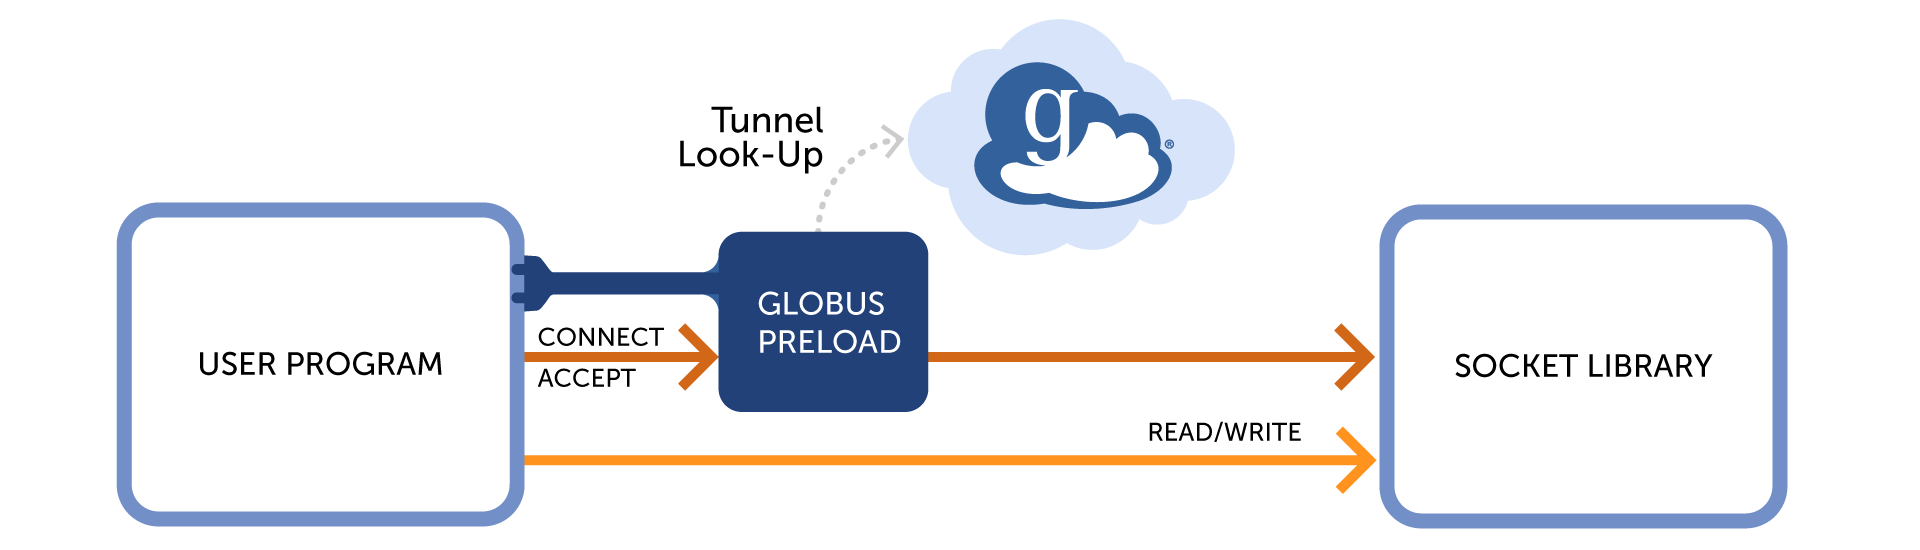
Here we see a diagram of how the preload library works. When a user runs their application, the environment variable LD_PRELOAD is set to libglobus_streams_client.so.0. Now when their application runs, the Globus library will be injected into the process space, and it will intercept calls to the system’s socket library that establish connections. When those calls are intercepted, the library will verify if they are destined for a Globus data stream or not. If not, the calls are simply passed directly through to the socket library.
If the connection calls are associated with a Globus data stream, then the PRELOAD library needs to determine the underlying contact points and perform the connection handshake protocol. Next, we describe the details of how the listening and initiator sides determine the contact points.
4.3.1. Listening Side
The following environment variable must be set prior to starting the listener application so that the PRELOAD library knows the listener ports and associated tunnel:
GLOBUS_STREAMS_INTERCEPT_PORT_<port number>=$TUNNEL_IDWhen a call to bind() is intercepted, PRELOAD looks at the listening port being requested. If that port has a matching GLOBUS_STREAMS_INTERCEPT_PORT_<port> environment variable then PRELOAD knows this is a Globus data streams port and the tunnel ID is the value of that environment variable. Once a bound listener is identified as a Globus data stream listener, the PRELOAD library will intercept any calls to accept() and perform the needed authentication protocol.
4.3.2. Initiator Side
The PRELOAD library on the initiator side must find out the ip:port to use when connecting to the initiator GCS and whether the connection requires the handshake protocol. Note the output of the globus-streams CLI initialize command discussed above:
$ globus-streams environment initialize 0a866857-141d-432f-a4b9-88dbbeb09cbb
Initializing the environment for tunnel: 0a866857-141d-432f-a4b9-88dbbeb09cbb
The environment is initialized for use with tunnel 0a866857-141d-432f-a4b9-88dbbeb09cbb
Your application key file base directory is /home/ubuntu/.globus/streams/
Your contact string is: globus.0a866857-141d-432f-a4b9-88dbbeb09cbb:3425
The last line shows the contact string to use when trying to form a connection through a tunnel. The hostname is globus.0a866857-141d-432f-a4b9-88dbbeb09cbb and the port is 3425. These are dummy values formatted so that the PRELOAD library can identify them as Globus data stream connections.
When a call to gethostbyname, or getaddrinfo, is intercepted by the PRELOAD
library, it checks to see if the hostname being looked up starts
with globus.. If so, it knows that this connection is destined for a
Globus data stream, and thus it must look up the real endpoint contact
string. To do this, it executes
globus-streams environment contact-lookup and associates the ip:port of
initiator GCS with the lookup value that it returns to the application.
Later, when a connect() call is intercepted by the PRELOAD library, if both
the host information and port match, then the PRELOAD library will perform
the connection handshake protocol.
TLS Support
A user may want to form a connection from an initiator client to a listening server through a Globus tunnel with TLS protection.
With standard TLS, the hostname the client connects to must match the server’s certificate. If it does not match, the TLS handshake will fail.
In Globus Streams, the client may be given a dynamically generated contact string, such as globus.0a866857-141d-432f-a4b9-88dbbeb09cbb.
This string does not correspond to the actual server hostname, so a direct TLS connection using this name will fail.
The --globus-contact option solves this problem by letting the client map a real hostname to the Globus tunnel. When initializing the initiator environment, you can specify the actual server hostname and port:
$ globus-streams environment initialize --globus-contact example.com:443 0a866857-141d-432f-a4b9-88dbbeb09cbbThis configuration tells the system: * Any connection to example.com:443 should go through the Globus tunnel 0a866857-141d-432f-a4b9-88dbbeb09cbb. * TLS handshakes will now succeed because the hostname used by the client matches the certificate presented by the server.
After initialization, you can launch applications through the tunnel with the mapping in place. For example:
$ globus-streams-launch.sh ${TUNNEL_ID} curl https://example.com:4435. Additional Reading
- Streaming Connection Authentication
-
A description of the authentication protocol used between your application and the Globus Connect Server.
6. Support
For questions on streaming, please contact support@globus.org.