Globus Connect Server Installation Guide
- 1. Introduction
- 2. Globus Connect Server Terminology
- 3. Prerequisites
- 4. Installation
- 5. Next Steps: Create a Gateway and Mapped Collection
- 6. Generating and Monitoring Log Files
- 7. Globus Help Resources
- 8. Upgrading Globus Connect Server
- Appendix A: Diskless Data Transfer Node Management
- Appendix B: Understanding Data Channel Traffic
- Appendix C: Decommissioning an Endpoint
- Appendix D: Major Distro Upgrade procedure
- Appendix E: Network Use Options
- Appendix F: Advanced Apache Configuration
1. Introduction
Globus Connect Server is designed for multi-user systems, such as lab clusters, campus research computing systems, supercomputers, and other multi-user high performance computing facilities. By installing Globus Connect Server on your system, researcher have access to the advanced data management capabilities offered by Globus. This installation guide provides an overview of Globus Connect Server for system administrators who will install and operate the service.
2. Globus Connect Server Terminology
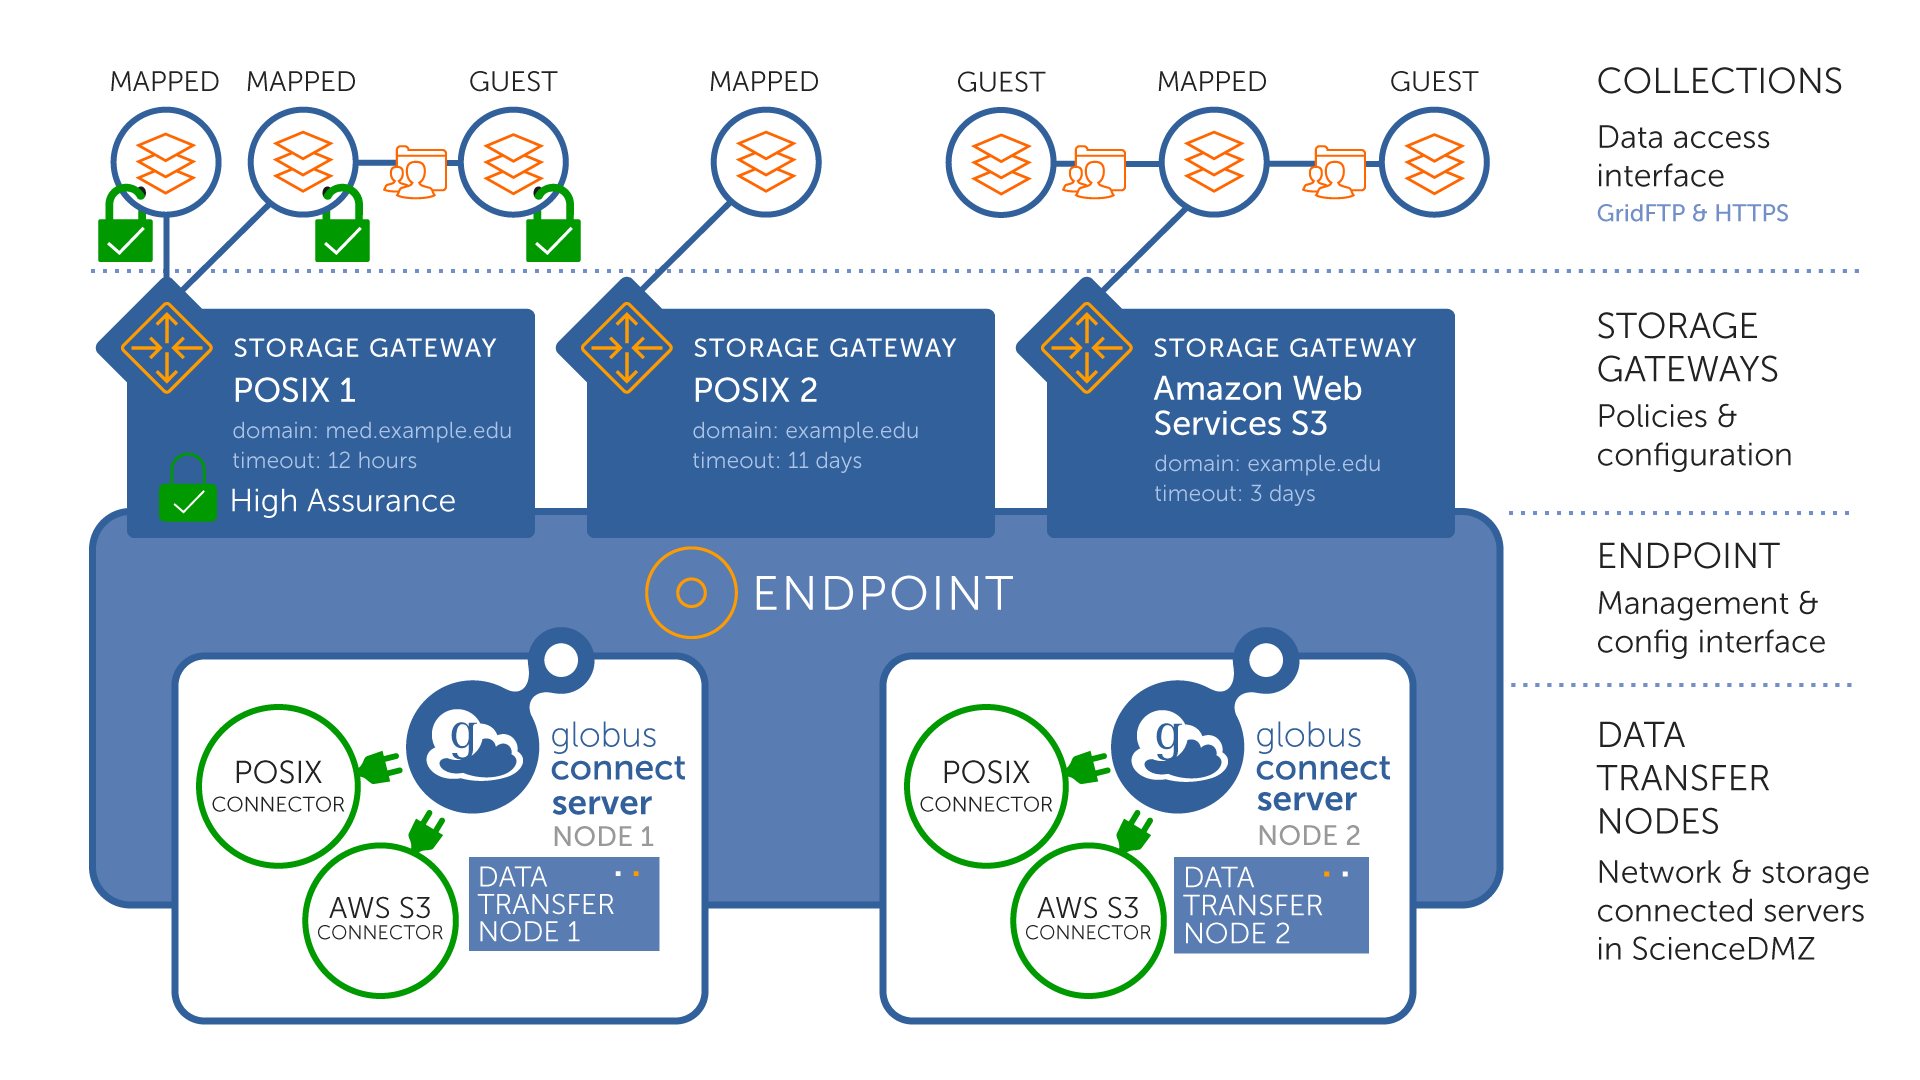
This section provides an overview of the components in Globus Connect Server.
It is good to refer to this image to help see how the components below fit together.
-
Endpoint: The endpoint is a deployment of Globus Connect Server. A single endpoint may optionally include multiple Data Transfer Nodes (DTNs) or servers. Each server or DTN is referred to as Node. The endpoint provides the interface for server management and configuration.
-
Storage connector: A storage connector allows the endpoint to use a particular type of storage, e.g., POSIX file system or Google Drive. You may configure multiple storage connectors for a single endpoint, allowing simultaneous access to all connectors.
-
Storage gateway: Storage gateways provide the storage access policies for the endpoint’s connected storage systems. A storage gateway is a named, discoverable interface by which authorized users can create and manage collections on a connected storage system. A connected storage system may have multiple storage gateways.
-
Collection: Collections provide the data access interfaces, allowing access via HTTPS (client/server access), GridFTP (asynchronous bulk transfer), and REST API (for advanced operations). A collection is a named set of files (or blobs) hierarchically organized in folders and associated with a specific storage gateway. Access to a collection is authenticated with OAuth2 access tokens issued by Globus Auth with data access policies defined in the collection itself. Globus Connect Server supports two types of collections:
-
Mapped collection: Each user accessing the collection must have a local account on the storage system. Their Globus identity is mapped to their local account.
-
Guest collection: Users can access the collection without a local account on the storage system. Access is based on permissions granted by an authorized user via Globus.
-
3. Prerequisites
3.1. Supported Linux distributions
Globus Connect Server is currently supported on the following Linux x86-64 distributions:
-
Red Hat Enterprise Linux 8, 9, 10 and derivatives
-
Rocky Linux, AlmaLinux, Oracle Linux, CentOS Stream
-
-
Fedora 43, 44
-
Debian 11, 12, 13
-
Ubuntu 22.04 LTS, 24.04 LTS, 25.10, 26.04 LTS
-
SUSE Linux Enterprise Server 15.6/15.7, 16.0
-
OpenSUSE Leap 15.6, 16.0
3.2. Memory
The minimum memory requirement for Globus Connect Server is 8GB of RAM.
3.3. Administrator privileges
You must have administrator (root) privileges on your system
to install Globus Connect Server;
sudo can be used to perform the installation.
3.4. System time synchronization
Your system must be running ntpd or another daemon for synchronizing with standard time servers.
3.5. Unicode Locale
Your system must use a unicode-capable locale in order to run the Globus Connect Server command-line
. For Red Hat variants and Fedora systems, you can use the en_US.UTF-8 locale,
and for Debian and Ubuntu systems, you can use the C.UTF-8 locale.
3.6. Internet-accessible system
Other hosts on the Internet must be able to initiate connections to the system where you will be installing Globus Connect Server. Your network administrator may be able to offer assistance if you run into problems, or contact us.
3.7. Open TCP ports
If your system is behind a firewall, several TCP ports must be opened for Globus to work. You may need to coordinate with your network or security administrator to open the ports.
The TCP ports that must be open for the default Globus Connect Server installation are as follows.
-
Ports 50000—51000 inbound and outbound to/from ANY
-
Used for GridFTP data channel traffic.
-
Ports in this range will be bound and used by GridFTP only during transfers as needed.
-
The use of the default port range is strongly recommended (you can read why here).
-
Data channel traffic is sent directly between endpoints—it is not relayed by the Globus service.
-
-
Port 443 inbound from ANY
-
Used by Globus Connect Server Manager Service
-
Used for GridFTP control channel traffic.
-
Used for HTTPS access to collections.
-
-
Port 443 outbound to ANY
-
Used to communicate with the Globus service via its REST API.
-
Used to communicate with cloud storage services.
-
Used to pull Globus Connect Server packages from the Globus repository.
-
If your data transfer node is already using the Apache webserver, or another service, on TCP port 443, see Appendix E for details on how to adjust the configuration so as to avoid conflicts between GCS and the other services.
3.7.1. Changing defaults
The above are for the default installation of Globus Connect Server. Some of the ports can be changed via the globus-connect-server command-line tool.
- Data channel traffic
-
The incoming and outgoing port ranges can be changed on a per-node basis by using the globus-connect-server node update command with the --incoming-port-range or --outgoing-port-range command-line options. Use of the default port range is strongly recommended as discussed in our Understanding Data Channel Traffic doc.
- Control Channel Incoming Traffic
-
The control channel port can be changed on a per-endpoint basis by using the globus-connect-server endpoint update command with the --gridftp-control-channel-port command-line option. This is available in Globus Connect Server version 5.4.55 or higher.
3.8. NAT Support
NAT deployments are supported provided that the ports needed by Globus Connect Server are properly mapped from the server’s public IP address to the server’s internal IP address and provided that systems in the NATed environment can connect to the server via its' public IP address (NAT loopback or similar).
When deploying a new node in your endpoint, you’ll need to use the --ip-address option for the globus-connect-server node setup command to ensure that your server’s public IP address gets registered for the node rather than the server’s internal IP address.
In scenarios where systems in the NATed environment cannot connect to the server via its' public IP address there will be certain caveats to consider:
-
You’ll need to use the
--use-explicit-hostoption to force the Globus Connect Server CLI commands you run on your server to connect to the Globus Connect Server Manager on the local host. If you don’t use this option, then the Globus Connect Server CLI will attempt to connect to your node’s public IP address. -
Transfers between multiple collections on the same endpoint, or between multiple endpoints in the NATed environment, may require advanced configuration and will not provide the same user experience. Contact support if you believe you are in this situation.
-
User client systems in the NATed environment may not be able to connect to the Globus Connect Server Manager, causing limited functionality for such users in terms of creating guest collections and managing credentials. Resolving such issues may require advanced configuration and may not provide the same user experience. Contact support if you believe you are in this situation.
4. Installation
A Globus Connect Server deployment includes installation of multiple components: (a) endpoint for servers and networking configuration, (b) storage gateways with connectors for storage system and policies information, and (c) mapped collections for users to access data. If you are familiar with installation of Globus Connect Server version 4, some of your assumptions about the installation process may no longer be valid. Please follow these instructions carefully.
This section covers the installation and setup of endpoint, and links to next sections for storage gateway and collection setup. As we walk through each part of this installation, links to alternate configurations and connectors (e.g., Google Drive storage gateway) will be provided. You can customize and fine-tune this configuration to your specific needs later without doing a reinstallation. Please see the Globus Connect Server Quickstart Guide for basic installation on a single node for access to a POSIX filesystem.
Before continuing, please confirm that the prerequisites detailed in the previous section have been met.
4.1. Install Globus Connect Server software
The integrity of our package repositories is ensured by GPG signature verification. While following these instructions and accessing our repository for the first time, you may be prompted to import GPG keys. Depending on your platform, the prompts can occur for one or more of our GPG keys, and may repeat when installing the first package. Our repositories have used the following keys:
GPG-KEY-Globus-2024:
  UserID     : "Globus <support@globus.org>"
  GPG Key ID : 0x39AF3E61
  Fingerprint: FD95 28E6 EE73 1D82 64C2 95D7 C934 C57C 39AF 3E61

GPG-KEY-Globus (no longer in use as of February 2026):
  UserID     : "Globus Toolkit <support@globus.org>"
  GPG Key ID : 0xFAF24365
  Fingerprint: 66A8 6341 D3CD B1B2 6BE4 D46F 44AE 7EC2 FAF2 4365
On systems with DNF5, you may also see GPG signature verification error before the first import prompt; this is expected.
Skip to the appropriate section for your Linux distribution and follow the instructions to install Globus Connect Server on your system.
This must be done on each system which will be acting as a Data Transfer Node for the endpoint(s) you create.
sudo dnf install https://dl.fedoraproject.org/pub/epel/epel-release-latest-8.noarch.rpm
sudo dnf install https://downloads.globus.org/globus-connect-server/stable/installers/repo/rpm/globus-repo-latest.noarch.rpm
Install the DNF config manager:
sudo dnf install 'dnf-command(config-manager)'Install Globus Connect Server:
sudo dnf install globus-connect-server54sudo dnf install https://dl.fedoraproject.org/pub/epel/epel-release-latest-9.noarch.rpm
sudo dnf install https://downloads.globus.org/globus-connect-server/stable/installers/repo/rpm/globus-repo-latest.noarch.rpmInstall the DNF config manager:
sudo dnf install 'dnf-command(config-manager)'Install Globus Connect Server:
sudo dnf install globus-connect-server54sudo dnf install https://dl.fedoraproject.org/pub/epel/epel-release-latest-10.noarch.rpm
sudo dnf install https://downloads.globus.org/globus-connect-server/stable/installers/repo/rpm/globus-repo-latest.noarch.rpmInstall Globus Connect Server:
sudo dnf install globus-connect-server54sudo dnf install https://downloads.globus.org/globus-connect-server/stable/installers/repo/rpm/globus-repo-latest.noarch.rpminstall Globus Connect Server:
sudo dnf install globus-connect-server54curl -LOs https://downloads.globus.org/globus-connect-server/stable/installers/repo/deb/globus-repo_latest_all.deb
sudo dpkg -i globus-repo_latest_all.deb
sudo apt update
sudo apt install globus-connect-server54curl -LOs https://downloads.globus.org/globus-connect-server/stable/installers/repo/deb/globus-repo_latest_all.deb
sudo dpkg -i globus-repo_latest_all.deb
sudo apt update
sudo apt install globus-connect-server54If you are using SUSE Linux Enterprise server, you must enable the PackageHub repository to install all of the Globus Connect Server dependencies.
sudo rpm --import https://downloads.globus.org/globus-connect-server/stable/installers/keys/GPG-KEY-Globus-2024
sudo zypper install https://downloads.globus.org/globus-connect-server/stable/installers/repo/rpm/globus-repo-latest.noarch.rpm
sudo zypper install globus-connect-server54
4.2. Create the endpoint
With the Globus Connect Server software installed on your server, the next step is to create the endpoint. You will run the globus-connect-server endpoint setup command to setup the endpoint across all of the Globus services it will need to function.
To create the endpoint, run the globus-connect-server endpoint setup command. This command need not be run as root user, and is run only once per endpoint, on the first node (server/DTN) setup for the endpoint. Subsequent servers/nodes that are added should not use this command, and separate instructions are provided for that.
This command creates an endpoint in the Globus Transfer service and obtains a DNS name and certificate for hosting the endpoint. In addition, it generates an encryption key used to confidentially manage configuration data which is backed up to Globus hosted service for management. The encryption key is written to the file deployment-key.json in the current directory. The data in this file is necessary to configure Data Transfer Nodes to host Globus Connect services.
The globus-connect-server endpoint setup command takes a number of command-line options, but the following ones are required to create an endpoint:
DISPLAY_NAME-
Name for the Endpoint
--organization string-
Organization operating the Endpoint
--owner string-
Identity username of the user who will be the administrator of this endpoint. (e.g. janedoe@example.edu). This must be an identity that has logged into Globus.
--contact-email ADDRESS-
Email address of the support contact for this endpoint.
Globus Connect Server prior to version 5.4.61 required manual registration with Globus Auth via the Developers web interface, and specifying client credentials to the Globus Connect Server CLI required the --client-id option. If you are running a Globus Connect Server version prior to 5.4.61 or your Globus Connect Server deployment key was created prior to version 5.4.61, you must use the --client-id option to this command.
Once run, the command prompts you to agree to Let’s Encrypt’s terms of service for having Globus Connect Server obtain a certificate for the endpoint using Lets Encrypt’s ACME protocol. The command takes a few minutes to complete as certificates are provisioned on the endpoint. Finally, it will provide a link to a login page so that the endpoint owner can set the advertised owner of the endpoint in the Globus Transfer service.
globus-connect-server endpoint setup "My GCSv5.4 Endpoint" \
    --organization "Example Organization" \
    --owner admin@example.edu \
    --contact-email support@example.edu
The command returns information about the endpoint that may be useful for additional configuration later, including the domain name of the endpoint, a link to send to subscription managers to set the endpoint as managed, and the redirect URI needed if Google Drive or Cloud connectors will be used with this endpoint.
The command will register the new endpoint with Globus Auth by creating a new Auth client under an existing Globus Auth project. If you do not have an existing Globus Auth project, one will be automatically created for you with the value of --owner as the project admin. If you have more than one project, the command will print the IDs of available projects. In that case, rerun the command using the --project-id option.
See globus-connect-server endpoint setup documentation for more information about all options to this command including additional information about the endpoint such as description and contact information.
--dont-set-advertised-owner option. The endpoint will still be initialized, but the advertised owner string won’t be set in the Transfer service. Users will not be able to discover the owner of the endpoint when searching in the Globus Transfer service. You can change this (after a node is set up) by having the endpoint owner use the command globus-connect-server endpoint set-owner-string to update the endpoint.
4.3. Set up services on the Data Transfer Node
Run the globus-connect-server node setup command to configure and start the
Globus services on the Data Transfer Node. This command must be done as the root user,
as it enables and starts systemd services. The deployment-key.json
file from the previous step will be used by this command.
Globus Connect Server prior to version 5.4.61 required manual registration with Globus Auth via the Developers web interface, and specifying client credentials to the Globus Connect Server CLI required the --client-id option. If you are running a Globus Connect Server version prior to 5.4.61 or your Globus Connect Server deployment key was created prior to version 5.4.61, you must use the --client-id option to this command.
sudo globus-connect-server node setupSee globus-connect-server node setup for more information about all options to this command.
4.4. Add Data Transfer Nodes to the endpoint
Endpoints can have multiple Data Transfer Nodes and these are called "nodes". For each Data Transfer Node, the Globus Connect Server software must be downloaded and installed as described in install section.
Once installation of the software is complete, the node
will be set up to be included in the endpoint. The setup requires the deployment-key.json
file from the previous step so the file should be copied over to each Data Transfer Node.
Run the globus-connect-server node setup command to configure and start the
Globus services on each Data Transfer Node. This command must be done as the root user as
it enables and starts systemd services. The deployment-key.json
file from the previous step must be available on the Data Transfer Nodes,
and the command must be run once on each Data Transfer Node to enable the Globus services on that node.
sudo globus-connect-server node setup
See globus-connect-server node setup for more information about all options to this command.
4.5. Log into the endpoint
For further configuration and management, tokens for authentication to the Globus Connect Server Manager service are needed. The globus-connect-server login command can be used to log into the endpoint for further configuration. This command will print out a login URL to follow to authenticate with Globus, and return an access code that needs to be pasted into the command-line tool. This will result in an authentication token that can be used to talk to the Globus Connect Server management API. As long as you are on a Data Transfer Node of an endpoint the "localhost" argument can be used to get credentials for that endpoint.
globus-connect-server login localhost
See globus-connect-server login for more information about all options to this command.
4.6. View endpoint configuration
You can now use the globus-connect-server endpoint show command to display the
configuration of the endpoint.
globus-connect-server endpoint show

Display Name:    My GCS Endpoint
ID:              a44ca3ef-a8b9-4b73-aa5f-546ed5ab7e66
Subscription ID: None
Public:          True
GCS Manager URL: https://09ad6.0.glob.us
Network Use:     normal
Organization:    Example Organization
4.7. Set the endpoint as managed
Endpoints that require premium functionality—such as guest collections for data sharing and premium connectors—must be managed under a Globus subscription.
If your organization has a subscription, and your Globus account has the subscription manager role, you may set the endpoint as managed using the globus-connect-server command as follows.
globus-connect-server endpoint set-subscription-id DEFAULTIf you are not the subscription manager for your organization, you will have to request your organization’s subscription manager to set the endpoint as managed. They can refer to the FAQ on using the Globus Web App to set that option.
4.8. Assign roles
Users or groups can be granted various roles on any managed endpoint, with
each role granting the user or group different privileges with respect to
that endpoint. Endpoint roles can be managed via the globus-connect-server
endpoint role command or via the endpoints page of the
Globus management console.
For example, to add an activity manager role, you could do the following:
globus-connect-server endpoint role create activity_manager manager@example.org
Role ID: e9edfc32-d3b6-45e3-b970-3c68af56859dSee the Endpoint Role command-line documentation for information on what roles are available, and details about how to manage roles.
5. Next Steps: Create a Gateway and Mapped Collection
At this point, you’ve installed Globus Connect Server on your Data Transfer Nodes and created an endpoint. However, an endpoint does not support data access without a storage gateway and mapped collection configured. You should follow the Data Access Guide to configure gateways and collections on your endpoint so users can access data via Globus.
Read the Command Line Reference for a complete description of the globus-connect-server command-line tool.
6. Generating and Monitoring Log Files
6.1. GridFTP Server Log Files
By default, the GridFTP log is located at:
/var/log/gridftp.log
The configuration settings for the GridFTP log file are found in this file:
/etc/gridftp.d/globus-connect-server
Logging for the GridFTP service is enabled by default. Additional details concerning logging for the
GridFTP server are available in the globus-gridftp-server man page here.
A logrotate config is installed to rotate the log weekly, retaining the last 5 logs.
/etc/gridftp.d/globus-connect-server* are not allowed and will be overwritten. If it is necessary to add custom GridFTP configurations, admins should create new files in /etc/gridftp.d/ and avoiding filenames beginning with globus. Keep in mind that configuration files are processed in ASCII order (eg. a config. file named z_logging would be processed after globus-connect-server, and would override any settings set earlier).
6.2. High Assurance Audit Log Files
Endpoints that have a high assurance subscription will have high assurance audit logs available at:
/var/log/gridftp-audit.log
The audit log contains a record for each login and file access on a high assurance collection. The format is explained in the audit log format reference. The globus-connect-server audit commands can be used for searching or exporting logs in standard formats.
A logrotate config is installed to rotate the log daily, retaining the last 90 logs to the /var/log/gridftp-audit/ directory.
Filenames and directory paths from high assurance gateways may contain sensitive data. GridFTP and HTTP server logs contain filenames and directory paths, and logs from high assurance gateways should be managed appropriately.
6.3. HTTPS Collection Access Logs
Apache logs for HTTPS collection access and errors are logged to the default Apache log path for your platform (/var/log/httpd or /var/log/apache2).
Starting with Globus Connect Server version 5.4.82, HTTPS collection access is logged to the file globus_access_log with the following format, which is similar to the Apache combined format with additional collection information.
<collection hostname>:<collection id> <client address> <authenticated globus username> <time> <request> <response status> <size> <client referrer> <client user agent>
Example:
m-019423.fe55.gaccess.io:bb31dd6f-cb77-4ff6-a487-d7bc6b545632 53.176.55.222 user@example.org [06/Feb/2025:19:49:04 +0000] "GET /data/example.dat?download HTTP/1.1" 200 188593 "-" "Mozilla/5.0 (Windows NT 10.0; Win64; x64; rv:135.0) Gecko/20100101 Firefox/135.0"
7. Globus Help Resources
7.1. Documentation Website
This website (docs.globus.org) contains a wealth of information about configuring and using the Globus service. Many common issues can be resolved quickly by browsing our frequently asked questions and reading the relevant guides and how-tos. We recommend consulting these resources first when looking for fast resolution to any issue you are having with the Globus service.
7.2. Mailing List
If you use Globus, then participating in the public email list is an excellent way to keep in touch with your peers in the Globus Community. Questions about managing your Globus Connect Server deployment, e.g. installing software for a Globus endpoint, configuring your firewall, integrating your institution’s identity system, development, and other inquiries can be raised on our discussion list — get more information on and subscribe to the Globus Mailing List.
7.3. Globus Support
Questions or issues that pertain to Globus Connect Server installation or to any client or service that is used in the Globus software-as-a-service (SaaS) or platform-as-a-service (PaaS) offering can be directed to the Globus support team by submitting a ticket. Subscriptions include a guaranteed support service level.
When submitting a ticket for an issue with Globus Connect Server, please include the endpoint name, a description of your issue, and screenshot/text dumps of any errors you are seeing. Please also include the output of Globus Connect Server’s self-diagnostic command, run as root, from the server hosting the endpoint:
globus-connect-server self-diagnostic8. Upgrading Globus Connect Server
Use the following instructions to update your installation. During the process of updating the packages, the Globus services on your Data Transfer Node will be restarted.
If you are upgrading from a version of Globus Connect Serverv5 prior to 5.4.67, you must also execute the
Globus Connect Server CLI Endpoint Key Convert
command in order to update your Endpoints Deployment Key (ie. deployment-key.json) and make it compatible with the
current release of Globus Connect Server CLI.
We have further details and documentation on this update available here.
8.1. Single Node Endpoint
8.1.1. Install Updated Packages
If you are unable to update packages due to a GPG signature verification error when accessing our package repository, ensure you have the latest globus-repo package installed.
RPM based systems:
sudo dnf install https://downloads.globus.org/globus-connect-server/stable/installers/repo/rpm/globus-repo-latest.noarch.rpmDEB based systems:
curl -LOs https://downloads.globus.org/globus-connect-server/stable/installers/repo/deb/globus-repo_latest_all.deb
sudo dpkg -i globus-repo_latest_all.deb
sudo apt update
During this update, you may be prompted to import a new key. See the install section for info on our current GPG signing keys.
Skip to the appropriate section for your Linux distribution:
sudo dnf upgrade '*globus*'sudo dnf upgrade '*globus*'sudo apt-get update
sudo apt-get install --only-upgrade ".*globus.*"sudo apt-get update
sudo apt-get install --only-upgrade ".*globus.*"sudo zypper update -r Globus-Connect-Server-5-Stable update '*globus*'8.1.2. Update Endpoint Policies
If the node belongs to an existing endpoint, run this command after all nodes in the endpoint have been upgraded in order to upgrade Globus Connect Server policies. This command only needs to be run once for the existing endpoint.
$ sudo globus-connect-server endpoint upgrade8.2. Multiple Node Endpoint
If you have multiple Data Transfer Nodes serving the same endpoint, then you must run the same version of the Globus Connect Server software on all of them. If you do not, there may be problems synchronizing the configuration between nodes and the service may not function correctly on all nodes.
If your endpoint consists of more than a single node, you can perform rolling updates in order to minimize downtime for the endpoint. By following the instructions below, one or more nodes can service user data transfers while the remaining nodes are upgraded and then the upgraded nodes can be brought into service while the other nodes are upgraded. Keep in mind the important note above, it is important that all enabled nodes in the endpoint are on the same version of Globus Connect Server.
-
Select 1 or more nodes from the endpoint to perform the initial upgrade. Selecting half of the nodes is preferred in order to maintain data transfer throughput.
-
Disable the nodes selected for the first round of Globus Connect Server upgrades.
$ globus-connect-server node update --disable e6968b77-266d-45c4-9d2b-a65a3a2b4fee Message: Updated node e6968b77-266d-45c4-9d2b-a65a3a2b4fee -
Follow the single node upgrade steps for each node in the set of disabled nodes.
-
Once the first nodes are upgraded, disable the active nodes in the endpoint. Do not enable the nodes in the first group until after this is done as you do not want to be running different versions of Globus Connect Server on various nodes in an endpoint.
-
Enable one of the upgraded nodes by running the node setup command on it locally.
Globus Connect Server prior to version 5.4.61 required manual registration with Globus Auth via the Developers web interface, and specifying client credentials to the Globus Connect Server CLI required the --client-id option. If you are running a Globus Connect Server version prior to 5.4.61 or your Globus Connect Server deployment key was created prior to version 5.4.61, you must use the --client-id option to this command.
$ sudo globus-connect-server node setup -
Enable the rest of the upgraded nodes.
$ globus-connect-server node update --enable e6968b77-266d-45c4-9d2b-a65a3a2b4fee Message: Updated node e6968b77-266d-45c4-9d2b-a65a3a2b4fee -
Upgrade Globus Connect Server on the nodes in the second group using the instructions in single node upgrade.
-
Enable the nodes in the second group.
Appendix A: Diskless Data Transfer Node Management
If you plan on using Globus Connect Server with diskless Data Transfer Nodes, you can use the following commands to prepare a Data Transfer Node node configuration that you can use to bootstrap the node setup command while retaining the node id and node-specific data encryption key. This will prevent with Data Transfer Node from creating a new encryption key at each boot (which will eventually cause problems), and ensure that when a node is deployed on a new IP address the Globus DNS record will be updated if the Data Transfer Node IP address changes.
A.1. Create the Data Transfer Node Configuration
Use the command globus-connect-server node create to export the configuration to use on a Data Transfer Node. This command can be run on any machine which has Globus Connect Server installed on it, and does not need to be run on the Data Transfer Node on which the configuration will be used. This command generates a new node ID and encryption key, and exports it to a JSON file which can be consumed by globus-connect-server node setup's --import-node command-line option.
The globus-connect-server node create command was added in Globus Connect Server v5.4.6
Repeat this once for each Data Transfer Node you will be configuring, using the --export-node command-line option to choose the output file path.
globus-connect-server node create --export-node node1.json
globus-connect-server node create --export-node node2.json
globus-connect-server node create --export-node node3.json
A.2. Deploy the Data Transfer Node Configurations
At Data Transfer Node initialization, you can use a command-line like the following to set up
the node and start the services. This example assumes that the file
/config/gcs.sh defines shell variables $GLOBUS_DEPLOYMENT_KEY to be the
path to the deployment key and $NODE_CONFIG as the path to one of the
node-specific configuration files created in the previous step.
Globus Connect Server prior to version 5.4.61 required manual registration with Globus Auth via the Developers web interface, and specifying client credentials to the Globus Connect Server CLI required the --client-id option. If you are running a Globus Connect Server version prior to 5.4.61 or your Globus Connect Server deployment key was created prior to version 5.4.61, you must use the --client-id option to this command.
. /config/gcs.sh

globus-connect-server node setup \
    --deployment-key "$GLOBUS_DEPLOYMENT_KEY" \
    --import-node "$NODE_CONFIG"
Appendix B: Understanding Data Channel Traffic
The data channel is where Globus Connect Server actually transmits the data that is being moved between endpoints. The default port range used for data channel connections is TCP 50000 to 51000. We strongly recommend that all endpoints be configured to use the default data port range, as this will provide maximum compatibility with other endpoints that are also configured to use the default data port range and have their firewall rules configured to allow traffic in this range. If your endpoint uses a non-default data port range, then you are - in effect - requiring other sites to potentially have to create additional firewall rules in order to be able to communicate properly with your endpoint. Many sites will not want to do this, which will thus limit the ability of your endpoint to interoperate with the majority of endpoints which are configured to use the default port range.
If two endpoints (ep1 and ep2) are to be able to successfully conduct transfers, then those endpoints must each be able to connect to each other in their configured data port ranges. For example, consider the following:
Globus Connect Server ep1 uses data port range 40000 to 41000
Globus Connect Server ep2 uses data port range 50000 to 51000
When two Globus Connect Server endpoints attempt to conduct a transfer, the endpoint that will be the recipient in that transfer picks out a port (or ports) in its configured data port range that it will listen on to receive the transfer from the sender endpoint. This port value gets communicated back from the receiver endpoint to the sender endpoint via GridFTP control channel data mediated by the Globus service, which both the sender and recipient are listening to on port 443 by default. Once the sender endpoint receives the data port range info for the recipient endpoint, it then initiates an outbound connection to that port (or ports) on the recipient to conduct the actual data transfer. The recipient endpoint will only listen on the selected data port(s) for the duration of the transfer. Once the transfer is over, the recipient endpoint will no longer bind the chosen data port nor listen on it.
To illustrate, consider the case of ep1 and ep2 mentioned above. If ep1 wanted to send ep2 a file, then ep2 would pick out a port (or ports) in its configured data port range of 50000 to 51000. For the sake of example let’s say that port 50021 has been chosen. This value would then get communicated from ep2 to ep1, via the Globus service through the GridFTP control channel that both ep1 and ep2 are listening to. At that point, ep1 would then initiate a connection out to port 50021 on ep2.
To further illustrate, consider again the case of ep1 and ep2 mentioned above. If ep2 wanted to send ep1 a file, then ep1 would pick out a port (or ports) in its configured data port range of 40000 to 41000. For the sake of example let’s say that port 40331 has been chosen. This value would then get communicated from ep1 to ep2, via the Globus service through the GridFTP control channel that both ep1 and ep2 are listening to. At that point, ep2 would then initiate a connection out to port 40331 on ep1.
It is also important to consider what happens in cases where one endpoint is a Globus Connect Server endpoint and the other endpoint is a Globus Connect Personal endpoint. In such cases, the Globus Connect Personal endpoint will always initiate the connection to the Globus Connect Server endpoint for the transfer. Thus, it will always be the Globus Connect Server endpoint that picks the port (or ports) on which it will listen for that connection. This is the case irrespective of which endpoint is the sender or the recipient. As discussed previously, this information gets communicated from the Globus Connect Server endpoint to the Globus Connect Personal endpoint via the Globus service.
After looking at the example given we can see that, in terms of firewall rules, the outbound rules for ep1 must allow it to connect outbound to ep2 on ep2’s configured data port range if ep1 is to be able to send files to ep2. In terms of inbound rules, the firewall rules for ep1 must be configured to allow it to accept inbound connections on its own configured data port range for it to be able to receive files from other endpoints. The firewall rules for the data port range of any endpoint will be similar, and must allow outbound connections to the configured data port range of a remote endpoint for the local endpoint to be able to send files to the remote endpoint, and must allow inbound connections to the configured data port range of the local endpoint for that endpoint to be able to receive files from other endpoints.
As illustrated, an endpoint must be able to receive inbound connections on its own configured data port range, as well as be able to make outbound connections to the data port range of any endpoint it wishes to communicate with. If all Globus Connect Server admins pick their own custom port ranges, then this quickly leads to a situation in which site firewall policies become littered with custom rules for these various port ranges and endpoints. However, if everyone uses the default data port range, then firewall rules are much more predictable and manageable. It is for this reason that we recommend that everyone use the default data port range for their endpoint. Those who use a custom data port range may find that they have problems with their endpoint being able to communicate with other endpoints, for the reasons detailed above. Those using custom data port ranges may also find that the admins of other sites and endpoints may not be willing to set up custom firewall rules to accommodate custom data port range choices.
Appendix C: Decommissioning an Endpoint
The following sections explain how to tear down a Globus Connect Server endpoint and return its nodes to pre Globus Connect Server installation condition. Care should be taken to perform these steps in order to properly decommission the endpoint.
C.1. Removing Nodes from the Endpoint
The following command will remove the node from the endpoint configuration and disable all Globus Connect Server services running on the local node. This command must be run from the node which is being removed.
sudo globus-connect-server node cleanupThis command should be repeated on all nodes in the endpoint before deleting the endpoint. See node cleanup in the CLI reference for more details on the command usage.
C.2. Deleting the Endpoint
The following command will delete the endpoint configuration in all Globus services. This process is irreversible, be sure that all nodes in the endpoint have been removed and that the endpoint is no longer needed before proceeding.
Globus Connect Server prior to version 5.4.61 required manual registration with Globus Auth via the Developers web interface, and specifying client credentials to the Globus Connect Server CLI required the --client-id option. If you are running a Globus Connect Server version prior to 5.4.61 or your Globus Connect Server deployment key was created prior to version 5.4.61, you must use the --client-id option to this command.
globus-connect-server endpoint cleanup \
    --deployment-key deployment-key.json
C.3. Deleting the Client Registration
endpoint cleanup without the --skip-delete-registration option.
This is the final step in deletion of the endpoint. Before proceeding, make sure that all nodes in the endpoint have been removed and that the endpoint has already been deleted. This step is irreversible.
-
Log into the Globus Developers web interface, app.globus.org/settings/developers, using the identity used when creating the endpoint.
-
Select the project on the right that contains the endpoint registration.
-
Find the Globus Connect Server client definition which contains the endpoint credentials.
-
Click Delete App Registration.
C.4. Removing Globus Software from a Node
Skip to the appropriate section for your Linux distribution and follow the instructions to remove Globus Connect Server from your system.
sudo dnf remove \*globus\*sudo apt purge \*globus\*Run the following command on the node after removing the Globus Connect Server software in order to delete any remaining Globus Connect Server files and directories. Many of these files may not be present on your node after successful uninstallation of the Globus Connect Server software and may likely only be present if your configuration included custom modifications.
sudo rm -rf /etc/globus/ \
            /etc/grid-security/ \
            /etc/gridftp.d/ \
            /etc/gridftp.conf \
            /etc/apt/preferences.d/globus \
            /etc/logrotate.d/globus-connect-server \
            /var/lib/globusoidc/ \
            /var/lib/globus-connect-server/ \
            /var/log/gridftp.log* \
            /var/log/globus-connect-server/ \
            /run/globus_oidc.sock \
            /run/globus-connect-server
Appendix D: Major Distro Upgrade procedure
When performaing a major distro upgrade (e.g. Ubuntu 22 to Ubuntu 24) of a server deployed as a node in support of an Endpoint, you will want to follow a procedure such as the below to avoid conflicting packages post-OS upgrade:
-
Verify that your Endpoint Deployment Key has been converted to the updated format required by the newer releases of GCS.
-
You can determine if the Endpoint Deployment Key has been converted by verifying that your
deployment-key.jsoncontains the Endpoint UUID as a value for theclient_idkey. -
In the case that you find that the Endpoint Deployment Key has not yet been converted, you will need to leverage the globus-connect-server endpoint key convert command to convert your Endpoint’s Deployment Key to the required format.
-
-
Upgrade your OS
Appendix E: Network Use Options
Globus Connect Server’s network use options are available for subscribed endpoints. Administrators can configure the amount of parallelism and concurrency that are available to the Globus Transfer service when accessing data on an endpoint’s collections. Administrators can set the network use options on an endpoint or on a storage gateway. The value set on an endpoint acts as a default for all collections except those on storage gateways which have their own setting.
Network use is set to the "Normal" level by default. Endpoints that have multiple physical servers with high-performance network and storage can set higher levels to ensure that Globus uses the bandwidth available, while smaller deployments can set this to lower levels.
Configuration settings from both the source and destination collections are used to determine the concurrency and parallelism options used for a given transfer. Transfers can then use a higher value if both collections support it, but Globus will not overwhelm smaller-capacity endpoints during transfers with larger-capacity endpoints.
Three preset options are provided for the endpoint administrator, which have the following values:
| Option | Value |
|---|---|
Minimal |
MaxConcurrency = 1 PreferredConcurrency = 1 MaxParallelism = 1 PreferredParallelism = 1 |
Normal (Default) |
MaxConcurrency = number of servers * 4 PreferredConcurrency = number of servers * 2 MaxParallelism = 8 PreferredParallelism = 4 |
Aggressive |
MaxConcurrency = number of servers * 8 PreferredConcurrency = number of servers * 4 MaxParallelism = 16 PreferredParallelism = 4 |
In addition to above, an administrator can choose the "Custom" option that lets them set absolute values for both concurrency and parallelism. All these options have a limit of 64 for MaximumConcurrency and MaximumParallelism. These values can be modified by using the --network-use option on the globus-connect-server endpoint update or the globus-connect-server storage-gateway update CONNECTOR commands.
For a given transfer, the concurrency is calculated as the smallest value across the MaximumConcurrency values of both endpoints, and the maximum of the PreferredConcurrency of both endpoints. Parallelism is also calculated similarly, with an additional consideration for transfers with high latency (trans-oceanic transfers) where the parallelism is set to minimum of the Maximum Parallelism value set for both endpoints.
Appendix F: Advanced Apache Configuration
When you run globus-connect-server node setup it enables the Apache web server
and some modules it requires, as well as enabling virtual host configuration
for access to the Globus Connect Server Manager API, HTTPS access to collections (if enabled) and
the Globus OIDC (if configured).
If your data transfer node is already using the Apache web server, the Globus Connect Server configuration should not conflict with that. However you may run into problems if you are running another service on TCP port 443. See the Proxy Configuration Guide for information about how to configure the Apache web server to proxy other web services.
Also, most operating systems provide a landing page as part of their default Apache configuration. This landing page is probably unwanted, and may be secured with a self-signed certificate. This is often noticed by network scanners as a configuration error. See the Default VirtualHost Configuration Guide for information about how to update the default configuration to use a valid certificate, restrict the pages it serves, or disable it altogether.